RECENT PAPER
ACCELERATED HIGH TEMPERATURE PERFORMANCE EVALUATION FOR ALLOY OPTIMIZATION, EMBRITTLEMENT AND LIFE ASSESSMENT
Materials Performance Analysis, Inc.
23005 North 74th St
Scottsdale, AZ 85255
Creep strength and fracture resistance are two properties that are critical in the selection and optimization of high temperature materials. These same properties may be progressively impaired by service exposure and are, therefore, key to the assessment of remaining life of high temperature components. In recent years, a methodology based on accelerated measurements of these properties has been developed. The two critical properties are decoupled in this approach which allows a clearer separation of the effects of microstructural evolution, damage development and environmental attack. The evaluation of creep strength is illustrated using extensive data on conventionally cast (IN738), directionally solidified (GTD111) and monocrystalline (CMSX-4) superalloys. It is shown that the properly defined creep strength is not sensitive to section size for any of the alloy classes. The well known effect of section size on rupture life of conventionally cast alloys is thus an effect on fracture resistance rather than creep strength. The comparisons with long term creep rupture test data show good agreement in all cases indicating that the accelerated testing is quite capable of yielding both comparative and design data. With the added advantage of a separate fracture resistance criterion the new methodology should be broadly useful.
Introduction
The industrial gas turbine has improved considerably in performance and efficiency in the past several decades due in part to advances in alloy composition and processing. For example, nickel based superalloys used in hot section blades have progressed from relatively simple wrought alloys to more highly alloyed investment castings, and recently to directionally solidified alloys including monocrystals. These materials developments have allowed blade temperatures to be increased, through improved creep strength and fracture resistance, for enhanced machine efficiency. However, the increased mechanical capabilities of the superalloys have to some extent been achieved at the expense of environmental resistance, so modern turbine blades are usually protected by an externally applied coating. This, in turn, complicates the design analysis of the part and, in particular, leads to major uncertainties in the estimation of safe and reliable component life.
The traditional approach to materials development, design, and life assessment for high temperature components requires extrapolation of experimental measurements of creep strain and fracture lives to times of 50,000 to 100,000 hours for many applications. Design protocol then calls for a safety factor which typically sets the allowable maximum stress at two-thirds of the mean extrapolated value. It might appear, therefore, that the most direct method of measuring remaining life after extended service would be to compute it based on the current remaining life of a sample taken from the component. Accordingly, methods have been developed to take miniature stress rupture samples from components and assess remaining life based on extrapolation from such data (1). However, since the material from a broken part has a finite life in a subsequent laboratory test, sometimes close to that of a new part, it may not be possible quantitatively to predict the remaining life of an unbroken part. This complexity has been called “the Remaining Life Paradox” (2). Also, failure in many of today’s peaking machines may result from thermal fatigue cracking rather than creep rupture.
Current methods of high temperature design attempt to incorporate time-dependent changes in the test methodology. However, creep rates and rupture lives relate to the starting material only in terms of the specific deformation path being imposed, i.e. a variable strain rate, variable true stress test with large amounts of strain accumulation and an arbitrary interaction between creep deformation and fracture processes. This history is quite different from any real service history. If we wish to simulate service complexity in our material testing, there is in fact a hierarchy of increasing complexity and expense. Thus, long term creep tests are inadequate; we must additionally account for non-steady test conditions, complex stresses, cyclic stresses, environmental effects, and synergism among them. We see that, even with the most complex test plan, we cannot approach most service operations.
To overcome these problems and inconsistencies a new conceptual framework based on setting separate minimum performance criteria for creep strength, fracture resistance, and other critical properties has been proposed. Termed “Design for Performance,” (3,4) this approach can, in principle, be applied both to initial design analysis and also to remaining life assessment. The concept is described in detail elsewhere (5). The new approach to high temperature design is thus to simplify the test methodology and develop tests to measure separately the high temperature creep strength and fracture resistance, ideally to evaluate the current state in terms of these properties. The consequences of microstructural evolution, induced in service or in laboratory simulations, can then be assessed using the same short time tests.
The creep strength criterion for high temperature applications may be developed from a series of carefully conducted stress relaxation tests (3-5) based on a methodology developed some years ago (6,7). The stress vs. time response is converted to a stress vs. creep strain-rate response. This is, in effect, a self-programmed variable stress creep test. Typically, a test lasting less than one day may cover five decades in creep rate. The accumulated inelastic strain is usually less than 0.1%, so that several relaxation runs at different temperatures and from different stresses can be made on a single specimen with minimal change in the mechanical state. Thus, an enormous amount of creep data can be generated in a short time.
The fracture resistance was based on a constant displacement rate (CDR) notched test (8), in which a crack is enabled to initiate naturally at a grain boundary and propagate slowly under closed loop displacement control. The tests were first performed on large specimens, at a temperature where the material was most sensitive to embrittlement, to establish the broad principles of the methodology, and then compared with data taken from miniature specimens machined from actual blades (9). It was established that environmental interaction, specifically gas phase embrittlement (GPE) resulting from intergranular penetration of oxygen (10), could drastically reduce the fracture resistance of polycrystalline alloys with little or no effect on the creep strength.
This paper describes the use of the SRT test to evaluate the creep strength of three classes of cast superalloys used in combustion turbine hot section blades. These were equiaxed IN738, directionally aligned GTD111 and monocrystalline CMSX-4. The results are compared with traditional long time creep measurements where possible. The importance of these results relative to the influence of fracture processes in the three structure classes, to hardware creep strength distributions, and to component life assessment is emphasized.
Experimental Procedure
Standard tensile specimens 76 mm long with a gage section of 25.4 by 4.1mm diameter were used. In addition, some miniature specimens 41.3mm long with a gage section of 25.4 by 2mm diameter were included. The SRT test procedure involved loading to the prescribed strain level, then holding the strain constant for twenty hours during which the stress relaxed as elastic strain was replaced with inelastic creep strain. Using the measured elastic modulus on loading, the stress vs. time response was converted to a stress vs. creep rate curve covering approximately five decades in creep rate, as described previously (5). This curve is the primary product of the analysis, and provides a comprehensive measure of the current creep strength of the material. For loading strains above about 0.4% (i.e. about 0.1% plastic strain), the plastic deformation is expected to lead to some recovery processes occurring during the test. However, to conform with traditional analysis and design approaches, the data were further reduced to produce stress vs. pseudo time to 0.5% creep strain. Since the prediction is for several thousand hours, based on the initial strain and the very low creep rates obtained during relaxation in a twenty hour test, it is appropriate to use the term pseudo time. Again, we emphasize that the SRT test does not contain information on time-dependent microstructural changes beyond the test duration. Nevertheless, a loading strain of 0.8% (~0.5% plastic strain) was used for comparison with traditional creep tests to 0.5% creep strain. Perfect agreement is unlikely because strain is not a state variable. However, this comparison serves as a legitimate calibration of the two methods.
To demonstrate the importance of a separate fracture criterion a few CDR tensile tests at 800C were used to show the effect of embrittlement on fracture. For these tests the miniature specimen was used so that it was not possible to run notched tests. However, the deformation to fracture in the smooth specimens provided a sufficiently sensitive measure of fracture resistance at 800C where the alloys are most vulnerable to fracture.
Results and Discussion
Examples of data generated for each of the alloys are presented and compared with equivalent traditional creep rupture tests.
Equiaxed IN738
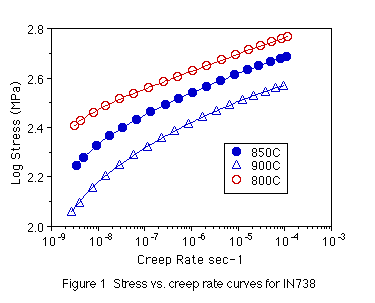
A typical set of stress vs. creep rate curves is shown in figure 1 for relaxation tests from 0.8% total strain (equivalent to approximately 0.5% inelastic strain). These were converted into stress vs. predicted (or pseudo) time curves (creep strain divided by creep rate) for 0.5% creep and shown in
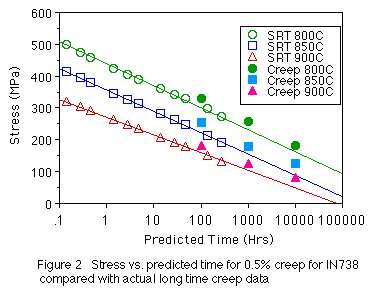
figure 2. Also included is actual times to 0.5% creep from traditional long term testing. These are from different heats, but the agreement is quite good. Since superalloys often have little or no primary creep there may be less sensitivity to deformation history then in alloys with pronounced transient behavior, so that the good agreement for the two testing methods is not unexpected. In fact it suggests that the alloys should not be too sensitive to prior thermomechanical exposures. In support of this, previous work has shown that prior thermal exposures at 1000C have little effect or may actually increase the creep strength. However, for exposures in air profound degradation of fracture resistance due to gas phase embrittlement was observed (9). Similar embrittlement was reported in the thin trailing edge of a serviced gas turbine blade. This clearly illustrates the value of decoupling creep strength from fracture resistance.
Recent work on this alloy using the SRT test has shown no effect of section size (11). It appears that reported section size effects on stress rupture (12,13) are due to the effect of thickness on fracture resistance, most likely as a result of environmental embrittlement. Hence, again, the importance of decoupling the two properties is justified.
Despite the lack of sensitivity to microstructural changes occurring during testing, major differences were noted in the initial properties depending on grain size differences.
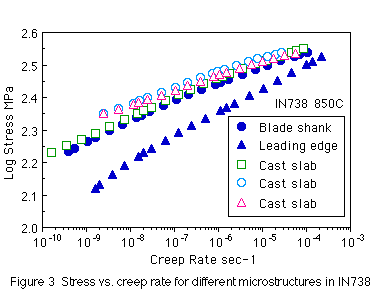
Figure 3 compares the creep strengths for sections taken from a thin leading edge, a blade shank and a cast slab. The grain size progressively increased in this order as the solidification rates decreased. Creep strength increased appreciably with increased grain size. This effect has now been observed in several blades for different alloys in unpublished work and is important because creep properties used in design are usually measured on specimens taken from cast slabs. The thin sections of blades, where creep strength is required, often have the lowest creep strength because of the finer microstructure.
Directionally aligned GTD111
Miniature specimens were taken parallel, perpendicular and diagonally with respect to the longitudinal growth direction. It was shown that there were major differences in creep strength for the different orientations (14).
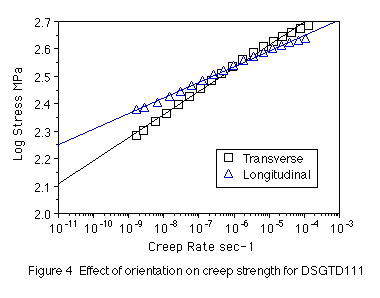
Figure 4 shows that at 900C the creep rate for the longitudinal orientation is lower at low stresses but higher at high stresses than the transverse orientation. A design stress in terms of, say, 0.5% in 100,000 hours or 1.4×10⁻¹¹sec-1, could be taken directly from figure 6. Transverse and diagonal properties were closely similar in this study.
Since there are few published studies for GTD111 (15), estimates for equiaxed GTD111 were made from a parametric rupture comparison (16). A stress rupture curve was estimated for 900C to give a good fit on a semi-logarithmic plot and compared in figure 5 with the SRT prediction for the transverse orientation.
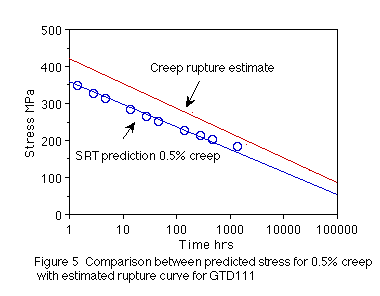
Since the time to rupture is typically two to three times the time to 0.5% creep in these cast alloys (except for directionally solidified alloys tested in the longitudinal direction where the increased ductility may lead to higher ratios), the comparison is quite good. This suggests that the SRT data could be used directly in standard design procedures either in terms of derived times or, preferably, in terms of stress vs. creep rate from the original analysis.
Monocrystalline CMSX-4
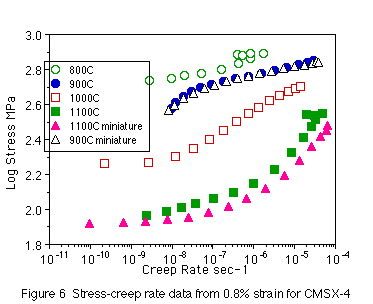
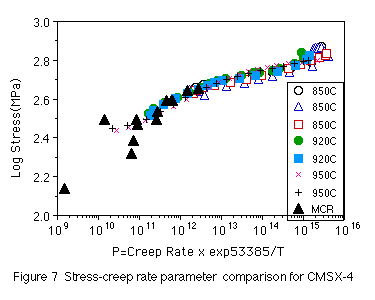
Figure 6 shows stress vs. creep rate curves at several temperatures from 0.8% strain. All specimens were within 8 degrees of <001> and were fully heat treated. The results are quite complex but show a clear trend from convex upwards at low temperatures to convex downwards at high temperatures. Two test temperatures were duplicated with miniature specimens and indicated no clear effect of specimen size on creep strength. In a separate study on the same alloy (17) SRT curves were compared with minimum creep rate data over a narrower temperature range of 850C to 950C. These data could be readily parameterized and the results are shown in figure 7.
Comparison of Creep Strength and Fracture Resistance
Although the results for each alloy could be parameterized, the optimum values of the constants in the parameters were unique in each case. Thus it was not possible to establish a general parametric comparison. Since data were available for all the alloys at 900C a simple comparison for that temperature was made (see figure 8).

This clearly shows the relative creep strengths of the three alloys. It also shows the effect of orientation for the DSGTD111 and the absence of a test section size effect for the CMSX-4. As noted previously, in tests at 850C, equiaxed IN738 also showed no significant section size effect (11). Creep strength when evaluated independently of fracture processes in terms of stress vs. creep rate is insensitive to test section size for both monocrystalline and polycrystalline alloys.
Fracture resistance is expected to be strongly sensitive to test section in polycrystalline alloys because of the intergranular penetration of aggressive gaseous species such as oxygen and sulfur. In the miniature specimen, for example, complete gage section penetration of oxygen will occur for IN738 in 24 hours exposure in air at 1000C (10).
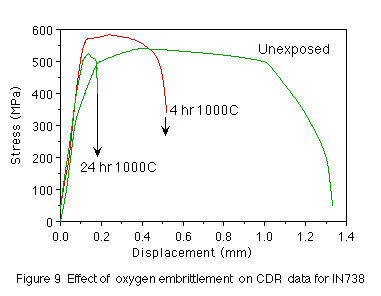
The consequence of such exposure is shown in figure 9 for IN738 and in figure 10 for the transverse oriented specimens of GTD111.
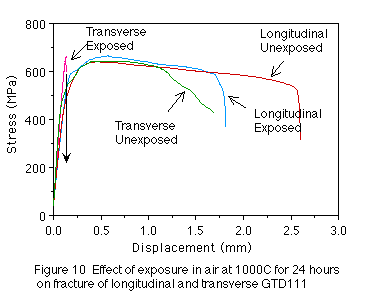
By contrast, the longitudinally oriented GTD111 in figure 10 suffers only a small loss in displacement at failure since failure is transgranular. In long time creep tests gas phase embrittlement (GPE) develops progressively and has a complex effect on measured deformation and life. Not only does it produce the section size effect on rupture life but the magnitude of the effect will be dependent on the test temperature and the duration (i.e. stress level). The decoupling of the properties in the current Design for Performance methodology greatly reduces this complexity as well as providing much more information in a shorter time.
Conclusions
1 Stress relaxation tests lasting 20 hours may provide stress vs. creep rate data covering up to five orders of magnitude in creep rate.
2 For the superalloys tested the results agree well with creep rate data or times to specific creep strains taken from conventional long time creep tests.
- Comparative and absolute creep strengths can be readily evaluated to examine orientation and chemistry effects.
4 The sensitivity to prior thermal exposures of creep resistance of these high strength superalloys is quite small.
5 There is a major effect of solidification rate on creep strength through grain size differences in IN738.
6 Components such as gas turbine blades with appreciable section thickness variations will have substantial variations in creep strengths. In cast blades the fine grains in the thin sections will generally give the lowest creep strengths.
7 Test section thickness for the same alloy and processing history has no significant effect on creep strength. This has been shown for both conventionally cast IN738 and monocrystalline CMSX-4.
8 Fracture resistance is strongly sensitive to section size in equiaxed alloys most probably because of gas phase embrittlement of grain boundaries.
9 By decoupling creep strength and fracture resistance the significance of many aspects of materials performance may be better understood.
Acknowledgement
This work was supported in part by the Electric Power Research Institute under contract #8512-10. The program manager was Wate Bakker.
References
1 R.Viswanathan and J. Foulds, J. Pressure Vessel Technology, ASME , 120, (1998), 105-115.
2 D. A. Woodford, International Conference on Fossil Power Plant Rehabilitation, ASM International, (1989), 149.
3 D.A. Woodford, Journal of Materials, 42 (12), (1990), 18.
4 D. A. Woodford, Creep: Characterization, Damage and Life Assessment, ASM International, (1993) 23.
5 D.A. Woodford, Materials and Design, 14 (4), (1993), 231.
6 E.W. Hart and H.D. Solomon, Acta Met., 21, (1973), 295.
7 E. W. Hart, C. Y. Li, H. Yamada, and G. L. Wire, Constitutive Equations in Plasticity, edt. by A. S. Argon, MIT Press, (1975), 149.
8 J. J. Pepe. and D. C. Gonyea, International Conference on Fossil Power Plant Rehabilitation, ASM International, (1989), 39.
9 D.A. Woodford, D. R. VanSteele, K. J. Amberge and D. Stiles, Materials Performance, Maintenance and Plant Life Assessment, Canadian Institute of Mining, Metallurgy and Petroleum, (1994) 85-100.
10 D. A. Woodford and R. H. Bricknell, Embrittlement of Engineering Alloys, Academic Press, (1983), 157.
11 D. A. Woodford, 1998, “Stress Relaxation Testing of Service Exposed IN738 for Creep Strength Evaluation,” ASME paper, submitted, (1998).
12 G. Oxx, Int. Conf. on Creep and Fatigue in elevated Temperature Applications, Philadelphia,” Inst. Mech. Engs., (1973), paper C212.
13 G. F. Harrison, and G. P. Tilly, Int. Conf. on Creep and Fatigue in Elevated Temperature Applications,” Philadelphia, Inst. Mech. Engs. (1973), paper C222.
14 D. A. Woodford, Materials at High Temperatures, 14 (4), (1997), 413-420.
15 J. A. Daleo, K. A. Ellison, and D. A. Woodford, J Eng. for Gas Turbines and Power, 121, (1999), 129-137.
16 P. W. Schilke, A. D. Foster, J. J. Pepe and A. M. Beltran, 1992, Advanced Materials and Processes, 4, (1992) 22-30.
17 D. A. Woodford and K. Iijima, unpublished work, 1998.
